Debra Prinzing

Get the Email Newsletter!

Episode 269: Living on a U-Pick Flower Farm and channeling your inner flower farmer, with Cathy Lafrenz of Miss Effie’s Country Flowers in Donahue, Iowa

Wednesday, November 2nd, 2016
The cutting garden at Miss Effie's is filled with sun-loving annuals, old-fashioned favorites, and lots of surprises for U-Pick customers to take home. (c) Jean Zaputil Photography

The cutting garden at Miss Effie’s is filled with sun-loving annuals, old-fashioned favorites, and lots of surprises for U-Pick customers to take home. (c) Jean Zaputil Photography

Do you need to relax? Do you need a break from traffic jams and hectic schedules? Then you need to come to Miss Effie’s. Miss Effie’s is a U-Pick flower farm on the east coast of Iowa.

Called the "corn-zebo," this charming open-air structure is fashioned from a former corn-storage silo and decorated with a whimsical door and roof. Here's where tea is served, with views of farm fields beyond.

Called the “corn-zebo,” this charming open-air structure is fashioned from a former corn-storage silo and decorated with a whimsical door and roof. Here’s where tea is served, with views of farm fields beyond.

That’s the invitation from Cathy and Cliff “Honey” Lafrenz the real human flower farmers who preside over Miss Effie’s Country Flowers (and Garden Stuff), a picture-perfect, two-acre country farm. Visiting was on my to-do list this past September, when I traveled to the Quad Cities area, which is a metro hub that connects Iowa and Illinois across the Mississippi River.

Two views of "The Summer House" at Miss Effie's, a tiny country crafts store where flowers, fresh eggs, and fine handcrafted linens can be purchased.

Two views of “The Summer Kitchen” at Miss Effie’s, a tiny country crafts store where flowers, fresh eggs, and fine handcrafted linens can be purchased.

I was lured to the area for several reasons, including an invitation from a local garden club in Moline, Illinois, which invited me to present a lecture about the Slow Flowers Movement, followed by a hands-on design workshop for 25 members using only Iowa-grown flowers.

Jean Zaputil captured the character and detail in every view -- from quilting fabric (and kitty) to a small wood stove.

Jean Zaputil captured the character and detail in every view — from quilting fabric (and kitty) to a small wood stove.

When the garden club booked my lecture, I told them I wanted to source local flowers — and fortunately, Miss Effie’s isn’t too far outside of the urban core. The garden club members arranged their pickup of hundreds of Cathy’s beautiful blooms and took time to process and every beautiful stem in time for our workshop.

Cathy Lafrenz (aka Miss Effie) and I enjoyed refreshments and recorded this podcast episode inside the cool shade of her "corn-zebo"

Cathy Lafrenz (aka Miss Effie) and I enjoyed refreshments and recorded this podcast episode inside the cool shade of her “corn-zebo”

That left room in the schedule for me to visit Cathy for a private tour, for refreshments and to record this podcast. I couldn’t have done any of this without the help from my dear, longtime friend Jean Zaputil of Studio Z – Design & Photography in Davenport, Iowa. I’ve called Jean my “garden muse” for years and now that she has moved back to her childhood state after being in Seattle for more than two decades, I don’t get to see her very often. The occasion of coming to Quad Cities to lecture was really a chance to visit and play with Jean, tour Iowa, go antiquing, sit by the fire as her husband Mark played old Beatles songs on his guitar, and generally soak up the Iowa life.

Gotta love a motto like this one, spotted high on a barn in the cutting garden.

Gotta love a motto like this one, spotted high on a barn in the cutting garden.

As it happens, Jean and Cathy are also friends, and we made a fun morning of our visit. Jean documented Miss Effie’s charm, character and creativity with her camera, and I have her permission to publish those photos on the podcast show notes. All images are (c) Jean Zaputil.

Find all-American and all-local Iowa-grown flowers at Miss Effie's.

Find all-American and all-local Iowa-grown flowers at Miss Effie’s, plus the clothesline and flagpole flapping in the breeze.

Here’s more about Miss Effie’s from the farm’s welcome page:

READ MORE…

Plant a conifer in a container for evergreen appeal

Friday, October 7th, 2011

Check out pages 122-128 for my "Evergreen Appeal" story featuring Jean Zaputil's container designs

The October issue of Better Homes & Gardens features a container design story that I created with my talented BFF Jean Zaputil of Seattle-based Jean Zaputil Garden Design.

This story began when I pitched the idea of a feature about using ornamental and dwarf conifers as the focal point of a fall container . . . that will then transition nicely through the winter months. My editor in the garden department, Eric Liskey, and his art director Scott Johnson liked the idea. But then they asked me to find a good location for photographing the fall story.

I immediately thought of Jean’s intimate Seattle garden, which is planted for all-season interest and has beautiful seating areas both in the front yard and back garden.

Once Scott and Eric signed off on the location, our challenge continued. Scott thought that a purple palette was both uncommon and a great foil for the evergreen needled foliage. So, needless to say, much of my energy producing this story was spent scouring the greater Seattle marketplace for plum, lavender, aubergine and purple containers. We ended up with a grand total of three pot styles – a small lavender ridged pot; an egg-shaped pot (in 2 sizes) and a classic olive jar shape (also in 2 sizes).

Thank goodness for some wonderful importers here in Western Washington who came to the rescue, including Washington Pottery and Aw Pottery! Our friend Gillian Mathews of Ravenna Gardens was extremely helpful in making those connections for me.

The tiniest pot, measuring only 7 inches, looks quite sweet in Jean's entry garden.

Jean used many of her favorite wholesale and retail nursery sources to come up with the conifer “stars” for each pot, as well as their companion plants.

The idea was to use only two or three accent plants in the container so as to show off the Hinoki false cypress, juniper and other conifers in their full glory.

We hope that this piece inspires readers who never before viewed a conifer as a container plant to do something fun and different this fall. I quoted Jean in the story saying:

“Use the golden glow or silver shimmer of an

ornamental conifer to catch the fall light.”

And Jean color-coordinated with her pots!

Here are some of the tips we outlined:

1. Use a large pot, if possible.

A 12-inch diameter pot is a good minimum size.

2. Start with a small juniper, cypress, or other conifer.

Then combine it with two or three complementary or contrasting cool-season annuals and perennials.

3. Flowering plants might fade after the first frost.

You can replace them with foliage perennials that will last through fall, even well into winter.

Here is the best of the best – from our photo shoot a year ago this month! Kudos to the very talented Laurie Black, who took the magazine photos, such as the one above. The photo of Jean and Pots 1, 2, 3 & 4 are my photos.

Pot 1

POT 1: Sadly, this gorgeous purple egg-shaped pot was left on the cutting room floor! But here is the recipe:

  • Juniperus horizontalis ‘Limeglow’
  • Japanese blood grass (Imperata cylindrical ‘Red Baron’)
  • Wintergreen (Gaultheria procumbens)
  • Chrysanthemum ‘Dazzling Stacy Orange’


Pot 2

POT 2: A miniature garden in a pot – perfect for a side table or the front porch:

  • Hinoki false cypress (Chamaecyparis obtuse ‘Verdoni’)
  • Japanese sweet flag (Acorus gramineus ‘Minimus Aureus’)
  • Bluestar creeper (Pratia pendunculata ‘Little Star’)


Pot 3

POT 3: This might be my favorite! We photographed it on Jean’s front porch, against her beautiful green screen door:

  • Hinoki false cypress (Chamaecyparis obtuse ‘Gold Fern’)
  • Tiarella ‘Sugar and Spice’
  • Vinca minor ‘Illumination’
  • Gazania Gazoo Mix


Pot 4

POT 4: This copper red “turnip” pot is one of two Jean already owned and we thought the color and shape looked autumnal, while also complementing the purple pot tones:

  • Juniperus horizontalis “Limeglow’
  • Moss (Schleranthus biflorus)
  • Sedum hakonense ‘Chocolate Ball’
  • Chrysanthemum ‘Dazzling Stacy Orange’

A few more tips, from the story:

When, and whether, you leave containers out all winter depends on where you live. In Zones 8-10, most conifers and cool-season annuals will survive outdoors in pots. In Zones 7 and lower, few annuals will overwinter in pots, and some evergreens won’t either, depending on hardiness. So before the ground freezes, transplant them to the garden or move the pot into a shed or unheated garage. Water pots as needed to keep soil moist throughout the winter. For outdoor winter use, pots should be glazed, hard-fired clay. Terra-cotta and soft-fired clay do not withstand freezing.

Amazing Folk Art at Seattle’s Walker Rock Garden

Saturday, February 26th, 2011

Simply mind-boggling, the detail and artistry of one man's vision.

The Walker Rock Garden has been the subject of fascination over the years. Tens of thousands of visitors — from rock and gem hounds and garden enthusiasts to folk artists and historic preservationists — have visited.

And each has an opinion about this modest West Seattle property built by Milton Walker over the course of several decades.

Now that I’m living back in Seattle, in West Seattle in fact, I was thrilled when my garden guru and friend Jean Zaputil told me there was a chance a few weekends ago to tour the property.

You see, the Walker Rock Garden, originally the home of Milton and Florence Walker, is being sold. No family members have lived in the humble white cottage for years, but one of their adult offspring and a niece recently listed it for sale and the agent, Brad Cooper, plans to regularly open the garden for admirers and anyone who wants a last chance to see this one-of-a-kind stone-sculpture installation. Visit the link above to learn about future open garden dates.

This garden began in the backyard of a residence where lived a family of five:  father, mother, two sons and a daughter. Like many similar gardens that move from private to public, this one has a back story. In spite of the various expectations that Milton’s heirs had for his rock garden, the one constant that most people can agree on is that his garden was an unparalleled artistic expression.

My friend B. McGillvray, a stonemason, artist and musician, agreed to share his first-person experiences about the Walker Rock Garden.

How do you describe the garden?  

An undated photograph of Florence and Milton Walker

The garden is one of the very best examples I’ve ever seen using this type of stonework. Milton was not a tinkerer. He was a highly visionary folk artist.

And yet he worked in semi-obscurity, right?

He was part of a group of men in America who fit this profile: they started in their mid-fifties, and they worked for about 20 years. Then they died or left their work, after which, within about five years, the place falls apart, is destroyed or sold. These people were eccentric. They definitely had a vision, a mission, for building their work.   What set them apart was that they were not formally trained artists.

What are some other examples?

I would include Kubota Gardens in Seattle and Watts Towers in Los Angeles.

When did you first visit the Walker Rock Garden?

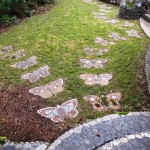
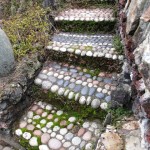
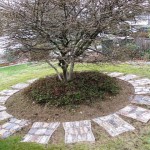
Intricately-patterned stepping stones lead through the garden.

In 1989. Milton’s death a few years before had put his wife Florence in a position where she couldn’t keep up the garden on her own. It’s a really intensive place (to maintain) and she had quite a job to keep everything running and clean. She talked with me while my friend went around and took pictures. I really connected with her and she asked me if I wanted to get involved with a group that was starting called “Friends of the Walker Garden.”

What was Florence’s role in the garden’s creation and preservation?

Florence made it clear to me that Milton was the sole visionary. He did the stonework and she did the garden. Florence was a longtime gardener who was a past president of the West Seattle Garden Club.  She was very well known and very wise about gardening in an old-fashioned kind of way. She was a plain-spoken person from Eastern Washington, yet she had a very Zen-like quality in the garden. When I met her, she was around 73 years old and she wore a big straw hat and used a big walking stick.

What did Florence tell you about how Milton begin to build his vision?

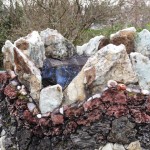
[In the late 1950s or early 1960s] Milton and his son George went to Ohme Gardens in Wenatchee, Washington. Ohme looks natural (you have to look hard to see that it is man-made). Milton was impressed with the Ohme ponds and how they reflect a bright greeny-blue color. He wanted to build something similar, so he created a pond in his backyard and painted the inside blue. But he was pretty disappointed because he thought it looked like a blue bathtub. So he started adding rocks to give it scale; after that, he built three more ponds and a fountain.

So the rock garden expanded from there?

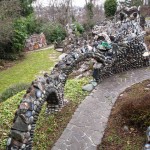
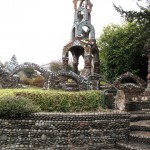
You can see the rustic "mountains" at the top right of this photo. They were said to be inspired by Washington's mountain ranges.

It’s all organic in the way it grew. The mountains, which look more rustic, are part of the older garden in the central area right behind the house. Milton was not a stonemason (he worked at the Boeing Co. as a troubleshooter), but he kept ramping up his work and improving his skills. What you see here is really world-class stone work.

When did he start doing the detailed rock-work?

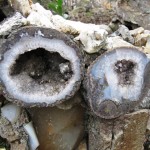
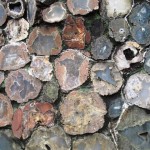
In the 1960s, Milton found out that a rock shop in Oregon was going out of business. He bought all of the inventory — 11.5 tons of rock, semiprecious stones and pebbles — for $175. As Florence told me, every weekend for one entire summer, they drove down and bought stone back to Seattle. The backyard had sorting bins and piles organized by color and size of rock.

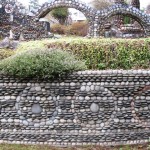
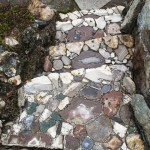
All those pieces became intricate walls, stepping stones, water features, a patio and outdoor fireplace, and an amazing tower. How did Milton actually build them?

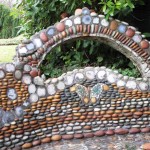
Some of the pieces were free-formed using rebar and concrete. Others started with half-thick cinder-block built as a regular, utilitarian wall you would see anywhere, then “rocked over” (Florence’s term) with pebbles laid in row after row, or matching pieces of agate.

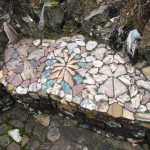
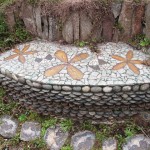
What is the significance of the butterfly motif?

I think Milton liked the symmetry of the butterflies. It was just a nice garden symbol. He used butterflies extensively in deluxe square-shaped stepping stones or by creating actual butterfly-shaped stones on the ground.


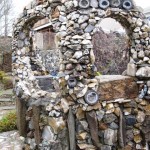
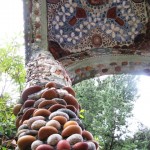
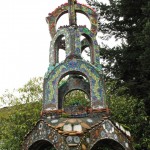
Can you tell me about the tower?

Milton erected and embellished a fanciful tower to honor America's bicentennial in 1976.

Milton called it the “Bicentennial Tower” and he gave it a birthday cake top that reads 1776-1976.

What about the semi-hidden swing wall at the lower level beyond the rest of the garden?

More beautiful stone butterflies appear on the "swing wall," partially hidden at the bottom of the garden.

It was one of Milton’s very last pieces, actually built over the kids’ swing set. The uprights and cross-sections became like the rebar that he built over. Milton used chips of marble, agate and chunks of slag glass.  I think had he lived, he would have continued building in that area of the garden.

Can you describe how your own work changed from your relationship with the Walker Rock Garden and from knowing Florence?

At the time I met Florence and helped her in the garden, I was working as a landscaper. It was while there that I took on more serious thought about stonework. Florence taught me how Milton made the pieces and I actually did some of the restoration of his work, such as patching and pasting.

Family and friends gathered for celebrations or simple meals on the covered stone patio, complete with an outdoor fireplace.

If I’m building something now, especially my water towers, I feel as if I’m influenced by Florence. I didn’t know Milton. I knew his work, but my insights of the garden came from Florence. She had a way of being inspirational. She had great little gardening tips that I still use and think about. Her love of that garden really came through and she chose to share the most intimate things about the garden with a small group of us.

Why did you fall in love with this place?

Milton was a great artist and Florence was really the personality in the garden. I saw an opportunity to learn some big lessons and I took it. I was half Florence’s age and we lived very different lives, but it was an amazing kind of relationship. I remember her 80th birthday when we gathered on the stone patio with a birthday cake recreating an exact stepping-stone.  The little pieces of chocolate were colored to represent the pebbles.

What do you think will happen to the garden now that it (and the home) is for sale?

The garden’s ownership will move out of the family. The primal knowledge of this garden is almost lost. People are saying they hope somebody buys it who loves it and preserves it. I truly hope that someone who is motivated does buy it to preserve the garden as an entire work of art.

A winter bouquet: arranging flowers from the January garden

Sunday, January 9th, 2011


By borrowing this lovely cream urn from my friend Lorene, and by clipping ingredients from her garden and that of Jean Zaputil's, I created a dramatic winter bouquet.

Earlier this week, my collaborator David Perry and I were the “program” for Woodinville Garden Club’s first meeting of 2011. It was an auspicious beginning for what we anticipate to be a great year gathering stories both visually and with words for our book project, A Fresh Bouquet.

Frequently, the feedback to our “seasonal, local and sustainable” mantra has to do with the argument that one can only follow this practice in the peak growing seasons when annuals and perennials are in their glory (you know what we mean – roses, peonies, dahlias, even sunflowers….they don’t usually sing in January!)

That’s true, but living in the seasons means that of course you don’t want a vase filled with August bloomers in the dead of winter. That’s like eating a mealy hothouse tomato out of season. Yes, it’s red in color, but that’s about as much in common the January grocery store tomato has with the off-the-vine, warm, juicy, flavorful heirloom you grow in the garden and add to your late summer salads.

So after our illustrated lecture on “A Year in Flowers,” featuring some pretty incredible images that Dave has captured on our joint and his solo excursions, we set out to design and demonstrate some great ideas for winter bouquets. Suffice it to say, David created an uniquely “David” arrangement. Yes, it involved power tools and an unexpected combination of leaves and blooms. When he blogs about it, I’ll add the link here.

This detail shot shows how the oakleaf hydrangea adds wine to the bouquet, showcased against the hellebore foliage; a glimpse of the yellow-and-green acuba foliage is in the upper right corner.

For me, I wanted to fill a vase with winter beauty. Some of you may know that our family is in a bit of transition. We finally sold our house in Southern California, but we are still living in a rental house in Seattle, while house- and garden-hunting for a permanent residence.

I yearn for my previous Seattle garden where I could gather more than enough ingredients for any impromptu bouquet (does this come close to admitting that I’m an over-planter? YES! But I don’t own that garden anymore, sadly). I’m a bit limited with the offerings at our rental house and I don’t want to denude all the plants my landlords consider theirs!

So, on Tuesday, I went “flower shopping,” which means I visited the amazing gardens of two friends, clippers in hand. It was sunny out, and very cold. Some of the shrubs showed signs of frost damage. After all, It was January 4th! But I was not disappointed and my garden designer friend Jean Zaputil walked me around her backyard and entry garden, encouraging me to take a little of this and a little of that.

Her bounty included Fatsia, which has huge, palm-like foliage. Green and glossy, this is good stuff – perfect for adding drama to a vase. We clippped branches of green Boxwood, another hardworking shrub that is just as hardworking in an arrangement. Oh, and the Sarcococca, or sweet box – divine. If you have never grown this evergreen shrub, which has little pointed leaves and hard-to-see, super fragrant white winter flowers, think about planting it now. It’s hardy in the Pacific NW….not in the midwest, unfortunately, according to my friend Danielle.

I also left with a few stems from Jean’s Acuba shrub, which is another one of those plants you sometimes ignore in the summertime when everything else looks so swell. But even the famed Christopher Lloyd admired this plant – its bright yellow foliage is splashed with green flecks. And there’s nothing like something golden to offset all that greenery. It ended up as one of the magical ingredients that perked up my bouquet. I also talked Jean into letting me clip two branches from her about-to-bloom Helleborus argutifolia – with its leathery, serrated, olive-green foliage and the pale green flower in bud.

Here's how the honeysuckle vine looks, wrapping around the base of the urn.

After leaving Jean’s, I headed to Lorene Edwards Forkner, plantswoman, designer, blogger and fellow writer — another incredibly talented friend (I am blessed with many of them!). Lorene’s garden is very close to Puget Sound, which is often a bit milder than the rest of Seattle. That’s the only reason I can come up with to explain why her Oakleaf Hydrangea shrub was still hanging onto several deep burgundy leaves in pretty sets.

Like the golden Acuba, the wine-colored Hydrangea foliage added great contrast to the bouquet. Oh- and the ‘Jelena’ witch hazel – yes, this glorious, fragrant shrub is just beginning to flower in Lorene’s front yard, so she allowed me to clip a few branches. The blooms of the witch hazel are little puffs of burgundy-copper – and it doesn’t take many of them to perfume a room. I made this bouquet on Tuesday and four days later, the dining area where I set the urn was still heady with the scent.

You can look closely to see most of these ingredients in the photos here. One more thing I want to share about this abundant bouquet. Notice the draping vine? That’s a cascading and twining length of a rugged honeysuckle, also from Lorene’s property. I wanted it to spill elegantly from the mouth of the cream-colored urn, but it was a little too stiff to give me the look I envisioned. So I started wrapping it around the base of the urn and – well, that looked better. I employed a trick I learned from a Portland floral designer we recently interviewed, Jennie Greene. She uses tiny lengths of twine-wrapped wire to secure branches and stems in place. Easy t0 find at craft stores, I pulled out a roll of the wire, cut off a couple inches and secured the honeysuckle in place.

Now who says there’s nothing to put in a vase in January? This creation illustrates just one way to gather from the winter garden. Go see what you can create!

What to do with salvaged shutters

Thursday, November 18th, 2010

Read on to learn what I'm going to do with these amazing shutters!

I recently spent the morning at a cool local flea market in Seattle. I was up early and out the door by 7:15 a.m., ready to get my creative juices going.

My mission: to discover as many castoffs from others that could make their way home with me.

The destination: 2nd Saturdayz, a popular flea market where vendors, dealers and designers come together to do business with salvage-savvy shoppers.

The apt motto: A Saturday Market of Fine Tastes and Curious Treasures.

Once inside the doors of a huge hangar (yes, the flea market is held at a decommissioned Naval base), I met up with Jean and Gillian. But not too much socializing is encouraged at these events. That is, IF you want to get the best deals. First-come, first-serve is the motto. Or: Every woman for herself.

I shouldn’t limit this endeavor to the female salvager because there were many men in attendance at 2nd Saturdayz. But still, you know what I mean. It’s a gal’s paradise.

Galvanized chicken feeder. 30 sizeable oval openings. A succulent planter or a flower holder? Or both?

Lately, I’ve been collecting vintage flower frogs, which makes sense since I’m living and breathing floral design. But this time, instead of finding glass and metal frogs, cages and stem-holders to displace the dreaded florist’s Oasis, I picked up a galvanized metal chicken feeder.

Think of a loooong ice-cube tray with oval cutouts. In metal. Very cool. Now that I’m looking at it again, I may just use this nifty piece as a planter for hardy succulents. It’s probably leaky so that’s going to give the drainage I’ll need.

A nearly-pristine child's typewriter complements my grown-up Underwood.

I also picked up a vintage child’s typewriter. It can play nicely with my retro black Underwood typewriter that we bought back in 1985 at the Rotary Club Auction on Bainbridge Island. I think I paid $5 back in the day.

Those old typewriters, truly relics, are now priced at $50 on up. And to think so many of them have been dismantled to make jewelry from the letter keys. I’m guilty of buying one of those alphabet bracelets, too.

When I walked into one small “booth” with my friend Jean, an awesome Seattle landscape designer, I found myself absent-mindedly stroking the frame and spindles of a cast iron baby crib. The vendor had taken off one of the crib’s side-rails and piled pillows and cushions on the springs and against the three remaining railings.

Here's the end of the baby crib. Next time you see this, I'll be lounging against some cushy pillows, perhaps under a shade tree. This crib will become my garden bench.

What did it recall? Yes, a very fashionable garden daybed or bench. And for $100, I totally lucked out. My friend Gillian, who is a pro at this sort of buying-and-selling of antiques and vintage items at Ravenna Gardens, pulled me aside to share the secret that she’s seen other dealers selling cast iron baby cribs for $600. I don’t have a “garden” in which to place this bench right now, since I’m in a rental house and I’m not yet ready to invest energy on land I don’t own. But . . . I did decide to bring this crib home and store the pieces in the garage until the next garden comes along. Luck-ee me!!!

I couldn’t ignore the central element inside the warehouse – a little hamlet of potting sheds. Their perky corrugated metal roofs, topped with finials created from shiny bits and pieces, stood high above the flea market’s landscape.

While gazing at the rustic but stylish potting sheds, I met designer/builder Bob Bowling. Owner of Bob Bowling Rustics of Whidbey Island, this engaging shed artist greeted me and generously shared his story.

Turns out, like some of the talented folks we featured in Stylish Sheds and Elegant Hideaways, Bob makes unique structures using reclaimed and recycled materials. Whimsical and playful, and finished off with salvaged windows, doors and other artifacts, the Rustics sheds are each a delight to see.

Bob's cool garden shed was hard to miss.

The "stripes" come from variously-stained boards.

The prices are reasonable, too. I should know. For $3200, you can get this “Rasta” shed. It measures about 7-by-7 feet in diameter (plus or minus) and features cool details, like the exterior of alternating stripes of differently-stained boards and the window boxes, door hardware and towering finial.

You could easily spend this much for a pre-fab storage or tool shed on the lot of your local big-box store. Which would add more art and style to your life, while also being quite functional?

All this thrifty flea-market shopping had energized me and made me feel quite artistic.

And then I met that shutter duo that called my name. Loudly. They appear to be half-circle crowns or eyebrow tops from a set of plantation shutters.

Wooden, with 2-inch deep slats, these pieces were displayed separately. Once I noticed both of them, I was not going to leave with just one! I don’t think I got a huge bargain, since I paid $28 apiece (but the seller insisted she had just cut the price in half). Whatever. When you spy something so uncommon, you have to act.

Other than changing the depressing buff-colored paint job to something more lively, what on earth do you suppose I will do with these crescent-shaped pieces?

Hello! You two are pretty darned cute. That Baylor Chapman is uber-talented!

Here's another small shutter-turned-wall garden, compliments of Baylor Chapman.

For inspiration, I hearkened swiftly to my visit to Baylor Chapman, a talented San Francisco floral and garden designer I recently profiled for A Fresh Bouquet. After my friends Susan and Rebecca took me to meet Baylor at her floral studio, the three of us accompanied her to her loft apartment in SF’s Mission District.

And there on the outside roof deck, were some pretty amazing succulent gardens – PLANTED IN SHUTTERS!!!

Naturally, I am going to draw from this incredibly clever idea and put those twin shutters to very good use with a vertical planting of hardy succulents. It may take until next spring, but stay tuned. And if you have any suggestions on what color I should use to upgrade the crappy paint color, please chime in.

The trick, according to Baylor, is to secure a layer of landscaping cloth like a little pocket or envelope behind each shutter opening. Then you can add potting soil and plant your sedums, succulents or whatever else seems fitting. You know, I really do love that chocolate brown finish on the shutters. Doesn’t it nicely offset the silver, gray, blue and green foliage of the succulents?

Well, all in day’s work. More to come as I execute these big plans.

My sedum-planted wicker chair

Sunday, May 23rd, 2010

Take a seat. A succulent seat, that is.

Voila! My sedum-planted wicker chair as garden art

If you’ve ever admired the charm and whimsy of a planted chair, you’re not alone. I’ve always liked plants combined as a design element with furniture. When my mom passed along Grandma’s 1940s wicker porch set, I knew that the slightly unraveled rocking chair was destined for a new role in my garden. So two weekends ago, on Mother’s Day, I started creating a sedum seat for the cherished rocker.

After giving Grandma’s wicker chair a fresh coat of herbal green paint, I was ready to turn the family hand-me-down into an ornamental garden feature. Here’s Part Two of my Mother’s Day gardening project, which illustrates how to prepare and plant the chair. 

Step One

Step One: Using a sheet of 1/4-inch wire mesh and a pair of wire clippers, I cut out a seat-sized section to fit into the chair’s base. A staple gun came in handy to secure the mesh to the piece of wood bracing.

Step Two: I layered sections of dry Angel Moss over the mesh. A highly-absorbent variety of sphagnum moss, Angel moss is a nifty product that I discovered last month while teaching four container and hanging basket design classes for Gardening How-To magazine. The moss hails from the bogs of New Zealand and, because of the way it is farmed and harvested, is considered a renewable resource. You can purchase pre-formed liners to fit into wire hanging baskets or flat sheets to use for projects such as mine.

Step Two

As dry as a piece of brittle cardboard, Angel moss changes its character dramatically when exposed to water. It’s a fabulous medium for baskets, window boxes and the mesh seat of my wicker chair because the moss proves itself to be an excellent material for holding soil and plants. It doesn’t dry out as quickly as the kind of coco-fibre or woodland moss we’re used to here in North America.

Step Three: On top of the Angel moss I spread approximately 3 inches of my planting medium. I’ve learned that the best environment for growing succulents (especially in containers) is to mix equal parts organic potting soil with cactus mix. Erin Taylor, owner of Botanik, a great garden emporium in Summerland (near Santa Barbara) taught me this recipe soon after I moved to Southern California. One look at her shop’s awesome succulent containers and I knew she was speaking from experience.

Step Four: My friend Jean Zaputil, who I call my garden muse for the 25 years of design, horticulture and landscaping knowledge she’s shared with me, was visiting from Seattle last weekend (along with our mutual friend Jan Hendrickson).

We had a little free time on Sunday morning so Jean offered to do the planting layout for my chair. She worked with about 14-16 small succulent plants of varying colors (ranging from silvery-white to lime green to red-burgundy).

Step Four

Before planting the “seat,” we tackled the tricky gap in one of the chair’s rolled arms.

Plants in the "arm"

A total negative from my mother’s point of view (the shredded wicker arm reminded her that a childhood dog had gnawed on the arm and practically ruined it for comfortable use), I decided to use the gaping void as a spot for more succulents.

Jean fashioned a shallow tray with the 1/4-inch wire mesh sheeting. We fit it under the arm and wired it into place. Just as with the seat, we inserted some pieces of Angel moss and poured in some soil. The chewed-away openings now hold three succulents, including the very pretty Sedum rupestre ‘Angelina’. Its chartreuse-color and fluffy form will drape over the arm and soon obscure the mesh tray.

Jean Zaputil, as always, my garden muse

Jean arranged the sedums, sempervivums and other succulents to create the planted seat.

Even though the root space appears shallow, these plants will do just fine. They are ideally suited for my project – able to withstand extended periods of drought.  A quick “shower” every week or so will give the plants enough moisture to take root in the soil/Angel moss and begin to spread, eventually filling in the seat.

And pretty soon, I’ll have a lush, succulent “cushion” for my grandmother’s wicker chair.

Now I’m looking at a modern wicker chair – a Pier One version with leg bent from too many teenagers leaning back in it while playing X-box games – and thinking about giving that chaise a new life in the garden. It’s currently natural colored, but maybe a coat of paint and a new planting theme will give it the necessary style to move outside.

Wonder what plants belong in that chair? Maybe I’ll paint it peacock blue and do an all-white flowering scheme! Stay tuned.

Seattle Gardens extraordinaire

Wednesday, July 1st, 2009

Seattle in June.

Blue skies, expansive views of water and mountains, blooming gardens, great friends.

Here are some photographs of two days in Seattle: Saturday and Sunday, June 27th and 28th:

The view from Ivar's on Lake Union: Seattle's skyline and the iconic Seattle Space Needle

The view from Ivar's on Lake Union: Seattle's skyline and the iconic Seattle Space Needle

My dear friend Lorene Edwards-Forkner was my dining companion, along with fellow Pacific Horticultural Foundation board members

My dear friend Lorene Edwards-Forkner was my dining companion, along with fellow Pacific Horticultural Foundation board members


Garden touring in the Seattle garden of Mrs. Alison Andrews

Garden touring in the Seattle garden of Mrs. Alison Andrews

Here's that garden without people

Here's that garden without people


My friend garden designer and writer Robyn Cannon joined me at the Andrews garden

My friend garden designer and writer Robyn Cannon joined me at the Andrews garden

Robyn's delicious salad with asparagus and a yummy fig wrapped in prosciutto - unforgettable!

Robyn's delicious salad with asparagus and a yummy fig wrapped in prosciutto - unforgettable!


Robyn and Don Cannon's oft-photographed Seattle hillside garden - inspiring and lavish

Robyn and Don Cannon's oft-photographed Seattle hillside garden - inspiring and lavish

Elegant and cool, a splashing fountain in the heart of Robyn's garden

Elegant and cool, a splashing fountain in the heart of Robyn's garden

Stopped by my friend and garden muse Jean Zaputil's for a view of her beautiful herb garden

Stopped by my friend and garden muse Jean Zaputil's for a view of her beautiful herb garden

It’s time to think about spring in the garden

Tuesday, January 13th, 2009

Yes, it may only be the second week of January, but our Noble firs and cedar boughs are now past their prime (and in my case, at least) cut up and ready for recycling in the yard-waste bin.

Onward to spring!

To get me in the mood, I have this inspiring drawing pinned next to my desk.

My friend Jean Zaputil, an artist and garden designer, illustrated and hand-colored it as a most charming New Year greeting.

The scene depicts a songbird perched on top of a hellebore, with the wistful and compelling lines, which read:

“If winter comes, can spring be far behind?” 

[attributed to Percy Byssne Shelley]

Perhaps this saying will give you something to hold onto in the dormant months of winter! Spring is coming soon!

Also getting me in the mood for spring: Country Gardens’ early spring 2009 edition, which just arrived in my mailbox. 

I opened it up to find my story about friend and designer Bonnie Manion, owner of Mon Petit Chou, a vintage design business based in Encinitas, California. Bonnie blogs at VintageGardenGal – a cheery and charming spot to visit – you’ll want to do so frequently!

The story, commissioned by James A. Baggett, editor of Country Gardens, is called “Tour de Forced Bulbs,” and it features Bonnie’s designs pairing forced spring bulbs with forced flowering branches – arranged in vintage containers.

Here is the story in its entirety. A shorter version appears in the magazine, along with the step-by-step instructions for planting a container with hyacinth bulbs and pussywillow branches. The story was photographed by Ed Gohlich and produced by field editor Andrea Caughey.

TOUR de FORCED BULBS: Get a jump on the season by pairing vintage vessels with spring-fresh forced bulbs to create uniquely charming displays.

The promise of spring appears in fresh-green leaves emerging from the pointed tops of daffodil, tulip, hyacinth and amaryllis bulbs at Bonnie Manion’s garden in Encinitas, California. Swelling buds on her flowering trees – apricot, plum and peach – hint at new growth about to unfurl into delicate blossoms and tender foliage.

Bonnie, a collector and purveyor of garden antiques and cottage décor, celebrates the season’s arrival by growing a multitude of flowering bulbs. But instead of digging holes in the ground for her many bulb varieties, this clever gardener relies on unique vintage containers for forcing and displaying masses of spring blooms.

She named her vintage design business Mon Petit Chou (translated from French, it is a term of endearment meaning “my little cabbage head”). The whimsical phrase encompasses her love of French antiques and American barnyard implements alike.

“I look for pieces with a history but that can also be repurposed and used in a fabulous new way,” Bonnie explains. She custom-designs her arrangements for special events and commissions, often advising customers about what to plant inside a chipped enamel kettle, a wire market basket or even an intricately-carved wooden drawer.

Come springtime, Bonnie considers flowering bulbs and branches as the perfect partners.

Some gardeners are intimidated by forcing bulbs, but to Bonnie, nothing could easier. “In a way, bulbs are similar to a chicken egg in that they are also one of nature’s perfect self-contained packages,” she says. “They have everything that’s required to bloom into a flower. There’s a lot of simplicity to growing them.”

Using fresh-cut branches, the flower and leaf buds of which have yet to open, requires little effort, Bonnie adds. Whether brought indoors for flower arranging, or used as accents to planted containers, the tiny buds slowly open until flowers gracefully unfurl. “They last quite a while, especially if you keep the branches in water,” she advises.

With a spring palette ranging from soft pastels to bright primary colors, bulbs and branches pair companionably with timeworn artifacts of the past. “I like the yin-and-yang of it. To me, the weathered patina of old containers goes well with the colors of my spring bulbs.”

To grow bulbs in containers, Bonnie begins with the right vessel, selecting an eye-catching piece with a generously-sized opening at the top. Bulbs don’t require much root space, meaning that even a four-inch-deep wooden box is adequate as a planter. Deeper containers can be used as well. “You can keep the soil level low around the bulbs, and use the height of the container to support bulbs such as paper whites or amaryllis, as they grow tall and reach for sunlight,” Bonnie says.

Interesting vintage containers include chicken feeders, tool carriers, old boxes or pails, hay racks, sugar tins, large and small funnels, oil cans, children’s wagons or carts, old urns, kitchen strainers – “virtually any container with a wonderful vintage character,” she says.

Bonnie’s finished designs look spontaneously fresh. “I get a lot of my plant and container ideas from my travels,” explains this vintage garden gal.

She frequents large and small flea markets and other off-beat vintage garden antique sources around the country and occasionally visits Europe for inspiration. “I might see a single potted rose in a Paris flower shop. Or, I’ll discover a dramatic floral arrangement in a London hotel lobby and try to recreate it at home.”

Bulb-filled vintage containers never fail to make a statement. “Put them in a setting in your garden where you need some ornamentation,” Bonnie suggests. “You can have fun bringing old pieces back to life and making them functional again. Get as creative as you like, and your pieces will be uniquely you!”

Forcing Bulbs

Try Bonnie Manion’s methods of planting spring-flowering bulbs in an unusual vintage or salvaged container. Look for blooms that will show off the best features of the vessel, such as crimson-streaked tulips that echo the red painted handle of an enamel kettle. Here are some tips:

  • Make note of each bulb’s “Plant-to-Bloom” timeframe to coincide with your needs. Bloom times vary greatly and you will need to plan ahead when planting.
  • Forcing bulbs in soil, versus water only, will ensure the bulb has the ability to bloom again year after year (replanted in your outside flower beds or another vintage container).
  • Use organic or general-purpose potting soil. The soil should reach a level one-inch below the container’s rim. Make sure you have good drainage so that any excess water is able to drip out of the base (you may need to use a saucer to protect furniture or windowsills from water damage).
  • Plant dormant spring bulbs directly into the potting soil. Bulbs should be root-side down and pointed-tips upward. It’s okay to pack bulbs “shoulder to shoulder” for a massed and abundant result. In general, you can completely cover daffodil, tulip and hyacinth bulbs with at least one inch of potting soil. The top third of an amaryllis bulb should peek out above the soil surface. Pack potting soil firmly around bulbs to anchor them in place and water once thoroughly to close any air pockets in the soil.
  • Bulbs require sunlight to awaken from their dormant state, and begin forming roots, stems, and flower parts under their onion-skin-like sheath.
  • Protect the container from extremes (place on a porch or under eaves in milder climates; bring indoors in colder ones). Do not let the soil dry out, but keep it lightly moist. In general, bulbs prefer to be on the drier side, rather than wet.
  • If you want maximum versatility with your designs, plant bulbs in small plastic nursery pots. One or two bulbs will fit inside a six-inch, soil-filled pot. You can plant up dozens of bulbs and care for them using directions above. Once they begin to bloom, arrange the bulbs inside larger containers and layer Spanish moss on top to cover your secret.

Check out one of Bonnie’s favorite bulb sources: Easy-to-Grow Bulbs.

Forcing Branches

Young branches of woody trees and shrubs are supple and pliable in the spring. This makes them easy to weave into trellis-like designs as Bonnie has done. If you cut the branches before their flower or leaf buds open, you can bring them indoors for long-lasting vase arrangements. Better yet, add cut branches to outdoor containers as a complement to spring bulbs. Here are some general guidelines:

  • Look around your landscape for inspiration. Do you have a golden forsythia, coral-bark maple, or flowering plum? As many of these woody plants are in need of early spring thinning or pruning, save the cut branches for container or vase designs. A neighbor might also allow you to lightly prune a few branches. In late winter or early spring, local markets or florists are good sources for cut branches, such as curly willow, quince, or witch hazel.
  • Use a pair of clean, sharp garden shears, secateurs or loppers to branches at a 45-degree angle. Make the cut at the bottom of a stem where it joins a larger branch.
  • You can stick the pointed base of each cut branch directly into the planting soil, at least three inches deep. As you water your bulbs, the branches will soak up needed moisture to keep the buds plump until they bloom.
  • You can also arrange cut branches in a water-filled vase. Flower preservatives can keep the water muck-free, but nothing’s better than replacing water daily.

Arts and Crafts architecture, then and now

Thursday, October 16th, 2008

Our beloved Seattle bungalow, updated from its 1924 origins

My interest in garden design from the American Arts and Crafts era is connected with the affection we have for a 1924 Seattle Craftsman bungalow, which my husband and I bought in 1996.

The one-story house, about 1,100-square-feet in size, was painted light gray. With faded white trim, it was not much to look at, as it had been a rental house for so many years (seen at right). On our first visit, we ignored the sofa on the front porch (below, left) and instead gazed at the breathtaking views of Lake Washington, the Cascade Mountains, Seward Park and Mount Baker.

Thus began our love affair with Craftsman architecture. We wanted to expand the house while also preserving its character. My husband Bruce met Toby Taylor of Caledonia Bay Builders after previously seeing his work and tracking him down through a real estate agent

Toby (seen below, right) and Bruce hit it off immediately, an almost unheard of phenomenon between a builder and a potential client who is also a lawyer. Toby introduced us to Robin Abrahams, a Seattle architect who he described admiringly. We were impressed when Toby told us that Robin was “way cool.”

Miraculously, we went with our “gut” feelings and hired them both (this was highly rare for my lawyer-husband, who typically would have insisted on competitive bids from three candidates). We’d heard all the horror stories. Nearly everyone we knew who had restored, renovated or built a home was unenthusiastic about the process, or about their contractor, or about their architect.

But our little project was blessed. We adored Robin and her colleagues at Abrahams Architects. She is a bundle of creative energy, a thoughtful, very smart, incredibly gifted designer. We also loved Toby’s verve, his hard-working, can-do attitude, and his often amusing ski-bum vocabulary.

READ MORE…