Debra Prinzing

Get the Email Newsletter!

Romantic, locally-grown flowers for a September Bride

Thursday, August 18th, 2011

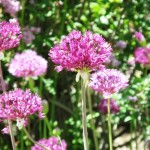
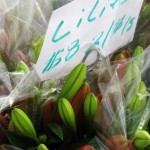
The boutonniere sample for Rashad.

My niece Marquis is marrying her sweetheart Rashad next month and Aunt Debby volunteered to design the flowers. Marquis’s color palette is soft yellow and white, which at first I thought would be a little too simple or possibly limiting in the floral options.

However, after we visited our favorite local flower farmers and saw all the wonderful options, I have a new-found love of the color combination.

As partners in a vase or bouquet, yellow and white flowers are simply romantic! Marquis asked that I use more yellow ingredients in her bouquet so it will be more visible against her white dress; the bridesmaids will have more white ingredients in their bouquets – which will show off against their pale yellow dresses. Great idea!

With amazing fresh, seasonal and locally-grown ingredients from Jello Mold Farm, J. Foss Garden Flowers and Oregon Coastal Flowers, I made the samples this week so Marquis could see how the designs would look . . . and to help me figure quantities of stems. Here is a sneak peek – I think they are absolutely summery and joyous, just what you want for a wedding:

Bridal bouquet for my niece Marquis

Ingredients include: White scabiosa with pale green centers (pincushion flower), two types of white dahlias – ‘Bride-to-Be’ and ‘Little Lamb’; two types of yellow dahlias – ‘Nettie’ and ‘Candlelight’; feverfew (the little white buttons, actually Chrysanthemum parthenium); yellow sprays of solidaster for a soft touch; and variegated scented geranium foliage from my garden. The solidaster is a hybridized cross of a goldenrod (solidago) and aster. So if it’s not still growing next month, we’ll substitute regular goldenrod, which will create the same dreamy affect.

A little detail of the bridal bouquet.

Here's how the mostly-white bridesmaid bouquet looks - it's also about one-third smaller than the bride's bouquet.

Finally, the centerpieces. We are going to use the same shallow glass Ikea bowls that created the centerpieces for Marquis’s sister’s wedding receiption last spring. But this time, instead of floating orchids and candles, I thought about creating a “nest” out of curly willow around the inside rim. The center will have a stunning floating dahlia, like ‘Snowbound’, the dinner-plate-sized one shown here. And I’ll weave smaller yellow flowers into the willow. Today, I played around with helenium, just to see how it looks.

The low glass bowl is filled with curly willow, yellow heleniums and one dinnerplate dahlia - in white.

You know, this floral design focus of mine has been really rewarding, both as a storyteller and garden writer. But there’s one really wonderful surprise that has come out of the four years I’ve spent working with photographer David Perry to document the local, seasonal and sustainable flower movement (see our blog, A Fresh Bouquet, for lots more details).

It has begun to dawn on me that I am a creative individual and I love to design and arrange with cut flowers. And while I am totally self-taught, I am actually good at it. I contend that gardeners are the ideal people to be floral designers. We know the habit, form and life-cycle of the ingredients we use, which is more than one can say for some in the conventional florist world. And so I am ever grateful for the opportunities I am given, like my niece’s upcoming wedding, to move my hands off of this keyboard, pick up a pair of snips – and begin to create.

Flowers, friends and fun in Colorado

Thursday, May 26th, 2011

Here I am with Arthur Williams, talented floral designer from Babylon Floral in Denver.

Where have I been lately? Last week, I hopped on an airplane and flew to Denver, which surprisingly is only 2-1/4 hours away from Seattle.

At the invitation of the Denver Botanic Gardens, my collaborator David Perry and I spent three lovely days giving talks and workshops about some of our favorite topics. We met some wonderful new friends and were inspired by the DBG’s beauty as a public space for all of Denver to enjoy.

Last Wednesday evening, I spoke about the “Personal Outdoor Dwelling,” aka “stylish sheds,” featuring many of Bill Wright’s gorgeous photos from our book Stylish Sheds and Elegant Hideaways.

Then on Thursday, David and I made a joint presentation on “A Year in Flowers: Seasonal, Local and Sustainable Ingredients.” We split the talk into two parts, an illustrated lecture and a flower design demonstration.

My arrangement from the demonstration, featuring Colorado-grown flowers and choke-cherry foliage from the Denver Botanic Gardens.

I was so fortunate that Denver floral artist and designer Arthur Williams, of Babylon Floral, helped procure locally-grown cut flowers for me to work with. Not only that, but he lent me some vases to use. We so enjoyed meeting Arthur and visiting his colorful shop (he’s pretty colorful, too – check out his arms!).

The following morning, Dave taught a hands-on photo workshop that wowed his students with new-found skills for their point-and-shoot digital cameras.

David's photography talk included practical, hands-on training at the botanic garden.

While Dave was with his students, I wandered along the Botanic Garden paths and through the various themed displays, taking in early Rocky Mountain spring day.

We found that the pace of spring’s unfolding in Denver is quite similar to Seattle’s this year. In other words, cooler than normal and later than normal. You’ll see what I mean in the photos I took.

On Friday, we spent a delightful afternoon with my friend and former editor Marlene Blessing. Marlene was my editor on The Abundant Garden and she also created the Pacific Northwest Garden Survival Guide and asked me to write it in 2004. She is an awesome writing coach and an encouraging advisor from whom I learned a lot about storytelling and book creation. I gained much confidence as a writer while working with this dear woman.

Marlene is presently the editor-in-chief of Interweave Press Books. After all the hue and cry about the publishing world falling apart, we took great comfort in the inspired, aggressive and confident approach to niche publishing embodied by this Loveland, Colorado-based imprint. With an emphasis on fiber arts and craft books, Interweave is led by a highly creative and innovative group, including Marlene. You can only imagine the compelling topics we covered during dinner later that evening. Marlene calls Interweave Press founder and creative director Linda Ligon her “Sensei,” but we kinda want to call Marlene our very own Sensei — what a breath of fresh air in a world of book-making!

Chet Anderson (center), with his mom Belle (left) and wife Kristy (right) at their Boulder County Farmer's Market booth.

After eating a delicious meal at Sugarbeet, a hip Longmont restaurant, we retired rather late and incredibly satisfied with our productive day. Bright and early Saturday morning, I picked Dave up at his hotel and we drove about 30 minutes to Boulder. There, we met up with Chet and Kristy Anderson, owners of The Fresh Herb Co., at their Boulder County Farmer’s Market booth.

Chet and Kristy’s farm is actually in Longmont, and they sell most of what they grow through Whole Foods and other retail outlets, but they still bring herb plants, hanging baskets and cut flowers to this market every Saturday. It is the only market in this part of Colorado that requires its vendors to sell what they produce. No dealers or re-sellers here. You meet the growers, purveyors and farmers who have raised or produced their goods – from amazing mushrooms to colorful Easter egg-colored radishes, to beautiful bouquets and more.

Rows and rows of luscious lilies fill 15,000-square-feet of covered growing area at The Fresh Herb Co.

It was fun to walk the market with Chet, who, I swear, could easily be called the “mayor” of the Boulder County Farmer’s Market. His popularity seems second only to his mother Belle’s popularity. She is there every week, helping at The Fresh Herb Co. booth, talking with new and returning customers, and greeting other vendors as longtime friends. It was fun to meet her!

David, Leesly Leon from the Denver Botanic Garden, me, Kristy and Chet Anderson - a group portrait at The Fresh Herb Co.

We followed Chet back to the family’s homestead and farm so that David could do some photography before a tour group from Denver Botanic Garden arrived. Leesly Leon, the DBG’s adult program coordinator, lined up the field trip so that some of the students in our workshops could have a first-hand visit to a flower farm. Chet and Kristy are very successful at what they do, but they are also passionate and humble about their role in bringing flowers from their fields to the customer’s vase.

 “When you know and meet the grower, and when the flowers are fresh and locally grown, there’s no better flower bargain,” Chet told the group. We couldn’t agree more!

Here are some more photographs from our trip – I loved every moment, every visual impression, and the great people we met.

When lilacs meet hellebores . . . and play with fritillaries

Friday, April 29th, 2011

A yummy spring bouquet - straight from local farms and fields

 Springtime is embodied in this vase, isn’t it?

Take a visual "whiff" and enjoy this combination of three lovely flowers.

You can almost smell that heady perfume associated with Syringa vulgaris, or the common lilac. To me, the fragrance is associated with my lifelong relationship with flowers. 

We lived in rental house in Connecticut when I was in elementary school; the backyard was home to an overgrown lilac that drew me to its blossoms (we loved playing underneath the flower-laden branches and smelling spring). 

Later, when I was a teenager, I remember secretly harvesting armloads at a city park and carrying them to school in May, as if I was in a pageant! 

When we planted our former Seattle garden in the late 1990s, I asked my friend Karen to select a lilac for the border. She chose one called ‘Sensation’ – it has deep purple florets and each petal is rimmed in white. That shrub never disappointed. . . and I waited for its blooms each year until we moved away. 

And most recently, while living in Southern California, I nearly fainted when I happened upon a lilac farmer at my local market. I was so fascinated to learn lilacs can grow there at a high elevations, such as in Lancaster, Calif., north of LA. I even had to run back to my car for my camera so I could interview her about those unforgettable flowers

Another closeup - I can't resist!

Today’s bouquet features the addition of several Jadeite-green garden hellebores and a few sultry plum-and-yellow Fritillaria assyriaca. These companions turn two bunches of just-cut lilacs into a sweet bouquet for my fireplace mantel. 

And the best thing about these blooms? They’re from local Northwest flower farmers – yeah! 

The lilacs were grown by Oregon Coastal Flowers in Tillamook, Ore. 

The hellebores were grown by Jello Mold Farm in Mt. Vernon, Wash. 

The fritillarias were grown by Choice Bulb Farms in Mt. Vernon, Wash. Check out David Perry’s gorgeous still life of this unusual flower at our blog, A Fresh Bouquet

If you’re a floral, event or wedding designer, be sure to meet these fabulous farmers at Seattle Wholesale Growers Market. If you’re a customer, be sure to ask your designer to patronize this amazing cooperative of local growers. Their motto is awesome: From Farm to Florist.

Here’s a link to a little post and gallery from my visit earlier this week.

Bouquet-making with spring bulbs

Friday, March 4th, 2011

A textural display of two colors of tulips with curly willow and camellia buds on stems fill this vintage green urn.

The Northwest Flower & Garden Show, the country’s second-largest indoor flower show, was staged last week. It was a great show and I’m sure I’ll be posting future stories about some of the wonderful design ideas, plants and speakers that inspired me. But right now I want to show off some of my floral design projects with simple instructions. The arrangements are from my talk and demonstration last Thursday on the Smith & Hawken DIY Stage. 

Here in Seattle the crocuses and snowdrops are only just now blooming. Daffodil foliage is just a few inches out of the soil. So my talk on “Floral Design with Spring Bulbs” was geared to the flower-lover who seeks out local blooms from growers in his or her own backyard. 

One such grower is Alm Hill Gardens, owned by Gretchen and Ben Hoyt. You can find Alm Hill flowering bulbs and other cool crops like lilacs and peonies year-round at the Pike Place Market and at weekly outdoor farmer’s markets including Ballard, University District and West Seattle.  I encourage you to always ask questions about where and how the flowers you buy were raised. There is nothing better than meeting the farmer who actually grew your bouquet.  

Fun on the Smith & Hawken DIY Stage

For a few weeks prior to last week’s flower show I had fun playing with tulips, daffodils and narcissuses, and hyacinth flowers to come up with the techniques I wanted to teach. 

The detail photos you see here are from those samples, so the tulips (sadly) are not Alm Hill’s, although they are still fresh and locally grown. During my demonstration I was too busy to stop and photograph each project, but perhaps someone who attended will surprise me with their pics, as my friend Lorene Edwards Forkner did yesterday when she showed up with a CD of a few photos from the talk (THANK YOU!). 

For each of these projects, my goal was to use an organic method of stabilize the blooms, rather than the conventional green foam blocks called “florist oasis.” That product, I have learned, is a carcinogen that contains formaldehyde (why would you want to touch or breath it?); and furthermore, it does not break down in landfills. I do understand why designers have used it for years. So far, there really isn’t an organic alternative to organizing and arranging flower stems to maintain the perfect form or angle. Yet increasingly, I am meeting and interviewing floral designers who consciously shun the green foam and use alternate materials to stabilize flower stems.

Here's a selection of my flower-stabilizing options, including lots of vintage glass and metal "frogs"

Here are a few options: 

  1. Pebbles, sand, gravel or marbles in the  base of a vase
  2. Pliable twigs wrapped around the inside of a vase to create a basket weave-like framework. One designer who David Perry and I interviewed uses shredded wood shavings called Excelsior inside her vases. This is the type of material used to ship wine bottles, and it’s biodegradable.
  3. Good, old-fashioned flower frogs in ceramic, glass or metal. I’ve been picking these up for a few bucks at weekend flea-markets. One of my favorite is a half-dome cage. It is heavy so it sinks to the bottom of the vase; and it has 3/4-inch square openings, which is ideal for woody stems. These are the arranging tools of the past, seriously useful for the present!
  4. Foliage. I often start an arrangement using soft, fluffy foliage as the “base” that peeks out over the top of the rim. For winter/early spring arrangements, Dusty Miller is a nifty option. It is lacy and soft – and it lasts for up to 2 weeks in water once cut. Once you fill the vase with the foliage, all the other flower stems can poke through the foliage and they will remain in place.
  5. Balled up chicken wire is another time-honored trick for stabilizing especially larger arrangements. It also works well for wide-mouthed vases. Get a roll at the hardware store (my local hardware store told me the proper name for this stuff is “Poultry Cloth” – whatever). You will need use wire cutters to trim off the length you want. Use gloves to protect your hands from wire scratches and create an open “ball.” After inserting into the container, make sure that a portion of the wire emerges above the rim so your design looks fuller.

All these fresh spring details play so well together, especially the sprouting willow branches and the camellia buds.

Design One:  Tulips (2 colors) with curly willow and camellia buds. I used a 4-1/2-inch diameter x 2-inch high dome-style metal flower frog in a vintage lime-green urn with handles.

  • Note that the curly willow is starting to sprout tiny green leaves. That’s what happens when willow stands in H20 for a few weeks inside a warm home.
  • As for the camellias, these are branches left over from a photo shoot last month. The dried leaves were crunchy and unattractive, but the buds were plump and interestingly shaped. So I grabbed my floral shears and clipped away the leaves. The chubby buds on the branches are a nice architectural accent.
  • I first inserted the willow and the camellia branches, forming an open “nest.”
  • Next, I inserted 10 red tulips, cutting their stems short so the flowers are close to the opening of my vase.
  • Finally, I added the yellow tulips, cutting the stems longer. You will note that none of the short or tall tulips are the same height. I like to stagger them so there is a less formal feeling to the design. As I inserted the tulips, I used the framework of the branches to also help support their flowerheads, especially the tall ones.

Flower stems, shrub twigs, pebbles and twine. Deceptively simple!

Design Two: Daffodils and red-twig dogwood branches. I used a 6-by-6-by-6 inch glass “cube” vase and filled the bottom 1/4 with medium-sized pebbles. 

  • The inspiration for this design comes from a Winter 2008 edition of by Design, which is published by The Flower Arranging Study Group  of the Garden Club of America. In the article, Cres Motzi demonstrated a way to layer a row of cut branches over the opening of a rectangular container and “strap” them on with twine to create a framework for inserting branches. Her design also used floral foam inside the container, but I find that completely unnecessary here.
  • Detail of the twigs as they are strapped onto the vase.

    I cut 9-inch lengths of pinkish dogwood branches, lining them up in parallel rows across the opening of the vase. Available at craft stores like Michael’s, twine-wrapped wire is an ideal material to strap around the bottom of the glass vase and over the twig arrangement. It can be twisted taut and secure. There is a band of twine on either end of the twig arrangement.

  • This design is so simple and serene that it called for a singular flower. Fifteen just-picked daffodil stems look great here. I inserted them into openings between twigs and twine, staggering them in an informal arrangement. You can see how well these stems stay upright, aided by the pebbles in the base of the vase.

Shades of white, silver and pewter make for a pretty wintry floral palette.

Design Three:  Hyacinths, Dusty Miller and pussy willow branches in a vintage oval vase. Here, the Dusty Miller foliage is the stabilizing element for the other stems. The vase is a 6-inch high vintage 1940s piece. The opening is an oval, approximately 7 inches long x 4 inches wide. I love this vase! It came from a visit to Old Goat Farm in Orting, Wash., owned by my friends Greg Graves and Gary Waller. Their nursery and shop is filled with surprises, including some vintage pieces like this.

  • Even here in the dead of winter, good old Dusty Miller (Senecio cineraria), a shrubby perennial from the Mediterranean region, is holding its own. Gray and kind of ubiquitous the rest of the year, Dusty comes in handy when one needs a soft foliage ingredient to contrast with darker greens. I robbed this batch (with permission) from my friend Nancy Finnerty’s Madison Park garden two weeks before I used it in the flower show demo. This stuff is pretty ironclad. Cut the stems as long as possible and start filling up the vase with them. The leaves are deeply cut and lobed; when used in a floral arrangement, they take on a lacy profile.
  • Insert 5 or 7 long-stemmed hyacinth flowers. Right now, Alm Hill Gardens is selling

    Ready for a close up!

    creamy white, dark pink and deep purple varieties – and the scent is truly intoxicating! Gretchen explains that she gets the longer-than-normal stems by starting the bulbs in the dark. Those poor babies are reaching for light during their growth phase, so that’s why their stems are much longer than the ones you or I would grow in the ground. Pretty gorgeous stuff. Again, notice that the stem lengths are staggered.

  • Finally, insert 7 or 9 pussy willow branches, also at varying heights. These are from a grower in Oregon and I like how they resemble floral exclamation points in this wintry white arrangement. This design is long-lasting. If the hyacinths decline (yet they still look great and this arrangement has been finished for 8 days!), you can always replace them, cuz the pussy willow and Dusty Miller will keep on keepin’ on for at least twice as long.

During my demonstration, I was so pleased that Gretchen Hoyt was in attendance with her assistant, as well as several other seasoned growers and designers – and they offered lots of suggestions and tips. One tip from Lorene’s bag of tricks os how to refresh H20 in a vase with so many complicated parts like the branched framework and the curly willow. Her technique is to first put the vase in the kitchen sink. Using the spray nozzle on the faucet, gently spray fresh water into the vase until the existing H20 starts spilling up and over the edge. If you continue for a minute or so, you will have completely replaced old, dirty water, with new, fresh water. Voila!

I'm working with locally-grown flowers and garden ingredients at the Northwest Flower & Garden Show.

If you are wondering about some of my other resources you see, here is a list:

  • Smith & Hawken copper watering can and other accessories are now available exclusively through Target stores.
  • The wonderful canvas work apron I’m wearing (right) was designed by my friend Janna Lufkin, who is a popular home organizing authority and stylist for Better Homes & Gardens and other outlets. Janna’s products are made locally in Seattle and available through her blog Be it Ever so Humble.
  • Tulips in February, grown locally in Northwest Washington by Alm Hill Gardens.

    Alm Hill Gardens can also be contacted for tulip deliveries. You can order any number of stems (there is a one-dozen minimum) of your favorite tulip colors and have them shipped via overnight or 2nd-day air.

  • To order or for more information, contact Alm Hill at almhillgardens@gmail.com or call toll-free at 855-ALM-HILL (855-256-4455). I took lots of photographs at their Pike Place Market booth last week and thought I’d share some of the yummy shapes and colors of these fresh, local and sustainably grown blooms. 

Finally, a special thank you to my partner-in-flowers, David Perry. The projects you see here will be featured in our forthcoming book, A Fresh Bouquet. And I can promise you that the photos he takes will be dazzling beyond belief.

We invite you to follow along with us on this journey at our blog, A Fresh Bouquet.

A winter bouquet: arranging flowers from the January garden

Sunday, January 9th, 2011


By borrowing this lovely cream urn from my friend Lorene, and by clipping ingredients from her garden and that of Jean Zaputil's, I created a dramatic winter bouquet.

Earlier this week, my collaborator David Perry and I were the “program” for Woodinville Garden Club’s first meeting of 2011. It was an auspicious beginning for what we anticipate to be a great year gathering stories both visually and with words for our book project, A Fresh Bouquet.

Frequently, the feedback to our “seasonal, local and sustainable” mantra has to do with the argument that one can only follow this practice in the peak growing seasons when annuals and perennials are in their glory (you know what we mean – roses, peonies, dahlias, even sunflowers….they don’t usually sing in January!)

That’s true, but living in the seasons means that of course you don’t want a vase filled with August bloomers in the dead of winter. That’s like eating a mealy hothouse tomato out of season. Yes, it’s red in color, but that’s about as much in common the January grocery store tomato has with the off-the-vine, warm, juicy, flavorful heirloom you grow in the garden and add to your late summer salads.

So after our illustrated lecture on “A Year in Flowers,” featuring some pretty incredible images that Dave has captured on our joint and his solo excursions, we set out to design and demonstrate some great ideas for winter bouquets. Suffice it to say, David created an uniquely “David” arrangement. Yes, it involved power tools and an unexpected combination of leaves and blooms. When he blogs about it, I’ll add the link here.

This detail shot shows how the oakleaf hydrangea adds wine to the bouquet, showcased against the hellebore foliage; a glimpse of the yellow-and-green acuba foliage is in the upper right corner.

For me, I wanted to fill a vase with winter beauty. Some of you may know that our family is in a bit of transition. We finally sold our house in Southern California, but we are still living in a rental house in Seattle, while house- and garden-hunting for a permanent residence.

I yearn for my previous Seattle garden where I could gather more than enough ingredients for any impromptu bouquet (does this come close to admitting that I’m an over-planter? YES! But I don’t own that garden anymore, sadly). I’m a bit limited with the offerings at our rental house and I don’t want to denude all the plants my landlords consider theirs!

So, on Tuesday, I went “flower shopping,” which means I visited the amazing gardens of two friends, clippers in hand. It was sunny out, and very cold. Some of the shrubs showed signs of frost damage. After all, It was January 4th! But I was not disappointed and my garden designer friend Jean Zaputil walked me around her backyard and entry garden, encouraging me to take a little of this and a little of that.

Her bounty included Fatsia, which has huge, palm-like foliage. Green and glossy, this is good stuff – perfect for adding drama to a vase. We clippped branches of green Boxwood, another hardworking shrub that is just as hardworking in an arrangement. Oh, and the Sarcococca, or sweet box – divine. If you have never grown this evergreen shrub, which has little pointed leaves and hard-to-see, super fragrant white winter flowers, think about planting it now. It’s hardy in the Pacific NW….not in the midwest, unfortunately, according to my friend Danielle.

I also left with a few stems from Jean’s Acuba shrub, which is another one of those plants you sometimes ignore in the summertime when everything else looks so swell. But even the famed Christopher Lloyd admired this plant – its bright yellow foliage is splashed with green flecks. And there’s nothing like something golden to offset all that greenery. It ended up as one of the magical ingredients that perked up my bouquet. I also talked Jean into letting me clip two branches from her about-to-bloom Helleborus argutifolia – with its leathery, serrated, olive-green foliage and the pale green flower in bud.

Here's how the honeysuckle vine looks, wrapping around the base of the urn.

After leaving Jean’s, I headed to Lorene Edwards Forkner, plantswoman, designer, blogger and fellow writer — another incredibly talented friend (I am blessed with many of them!). Lorene’s garden is very close to Puget Sound, which is often a bit milder than the rest of Seattle. That’s the only reason I can come up with to explain why her Oakleaf Hydrangea shrub was still hanging onto several deep burgundy leaves in pretty sets.

Like the golden Acuba, the wine-colored Hydrangea foliage added great contrast to the bouquet. Oh- and the ‘Jelena’ witch hazel – yes, this glorious, fragrant shrub is just beginning to flower in Lorene’s front yard, so she allowed me to clip a few branches. The blooms of the witch hazel are little puffs of burgundy-copper – and it doesn’t take many of them to perfume a room. I made this bouquet on Tuesday and four days later, the dining area where I set the urn was still heady with the scent.

You can look closely to see most of these ingredients in the photos here. One more thing I want to share about this abundant bouquet. Notice the draping vine? That’s a cascading and twining length of a rugged honeysuckle, also from Lorene’s property. I wanted it to spill elegantly from the mouth of the cream-colored urn, but it was a little too stiff to give me the look I envisioned. So I started wrapping it around the base of the urn and – well, that looked better. I employed a trick I learned from a Portland floral designer we recently interviewed, Jennie Greene. She uses tiny lengths of twine-wrapped wire to secure branches and stems in place. Easy t0 find at craft stores, I pulled out a roll of the wire, cut off a couple inches and secured the honeysuckle in place.

Now who says there’s nothing to put in a vase in January? This creation illustrates just one way to gather from the winter garden. Go see what you can create!