


FedEx Flowers: How to ship a wedding or gift bouquet
May 24th, 2013
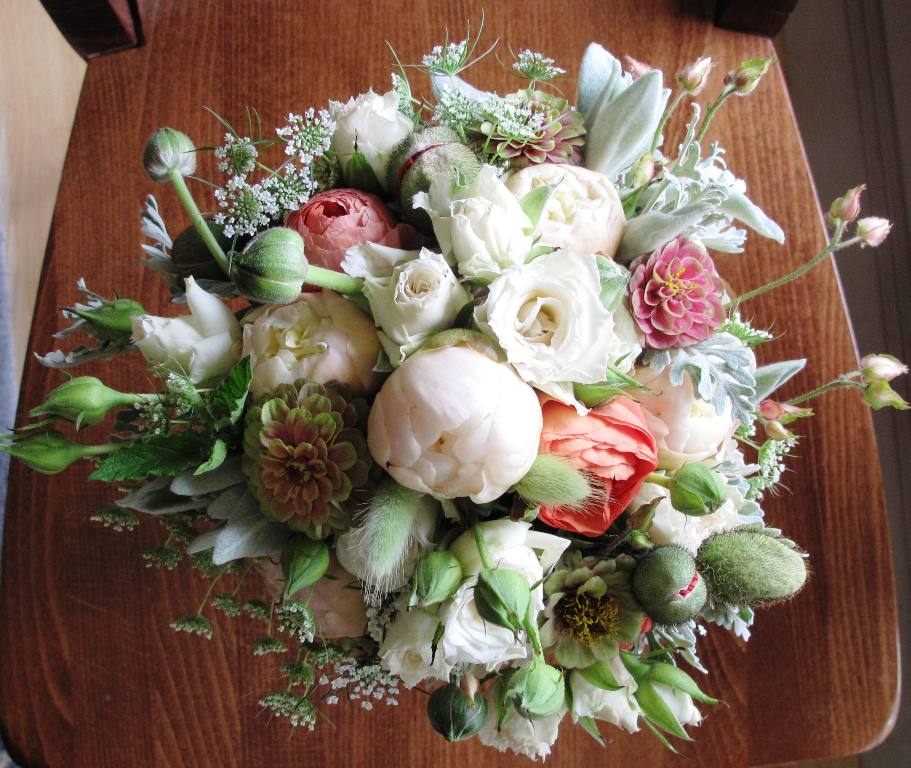
Tight flower heads, soft foliage that doesn’t bruise easily, and interesting textural elements – add up to a wedding bouquet for a friend far away.
A dear friend of mine is getting married today, in a state halfway across the country. None of her close friends are there to support her, mostly because she only recently moved away from Seattle to be close to her sweetheart. But at least she’s going to hold a bouquet of flowers I made Wednesday and sent via FedEx overnight delivery service. Her new husband will be wearing a sweet little boutonniere I sent along.
Here’s how to successfully make and send a long-distance gift of flowers:
1. Select durable flowers with fairly tight buds. I chose all Northwest-grown flowers in a cream-to-peach-to-coral palette:
- Spray roses have tiny heads and are long-lasting. ‘Moonstruck’ is a creamy white variety grown by Peterkort Roses.
- Peonies are super-durable, especially when you start at the “marshmallow” stage when just a small amount of color is showing at the top of the bud. The blush peonies I used are sublime, grown by Ojeda Farms.
- Ranunculus are a more fragile than the spray roses or tighter peonies, but the petal colors are so delicious that I took a risk. I chose mostly-closed flower heads and tried to nestle them between other, sturdier flowers to sort of shelter them in the bouquet. These were grown by Vivian Larson of Everyday Flowers. She literally saved the last ranunculus stems of the season for me.
- Poppies, especially in bud with those fuzzy green cases, are the epitome of springtime. The petals on these are more like a persimmon-orange color, which made them a little too dark for the bouquet palette. So I used only the tightest buds and lifted them up above the main bouquet. A sliver of the dark orange peeked out, but that only added to its charm. These were grown by Jello Mold Farm.

Another view of the bouquet details. Notice the fuzzy poppy “pods” with just a touch of coral showing through.
2. Select foliage that won’t bruise or break. That was easy with such lovely options:
- Lamb’s ears, grown by Janet Foss of J. Foss Garden Flowers (Washington)
- Dusty Miller, grown by Charles Little & Co. (Oregon)
3. Incorporate soft, textural elements. I’ve taken a vow not to use the “F” word, which you may recognize as “filler.” Recently there was a huge discussion on the bulletin board of the Association of Specialty Cut Flower Growers about banning the term. One grower weighed in and said:
I’d like to see all of us and everyone else in the flower business stop using the word filler. Call these flowers what they are – foliage, spray flowers, textural material, grasses, grains, seed sprays, branches. Are the oils used in painting the background of the Mona Lisa of a lower value than those used to paint her face? I happen to think that a spray dianthus is much more intrinsically beautiful than a modern carnation or any of the other overly bred blobs of color so in demand as focal flowers. I also feel that an arrangement with elements of line, motion and negative space are almost always more pleasing than a bunch of fat heads chockablock in a wad, and a lot more difficult to achieve. It does none of us any great service to dismiss half of what we grow as just something to take up space. We should be marveling at the complexity of all of it, and passing that wonder on to our customers.
So here’s what I used:
- Bunny tail grass, unopened rock rose buds (Cistus sp.) and Queen Anne’s lace
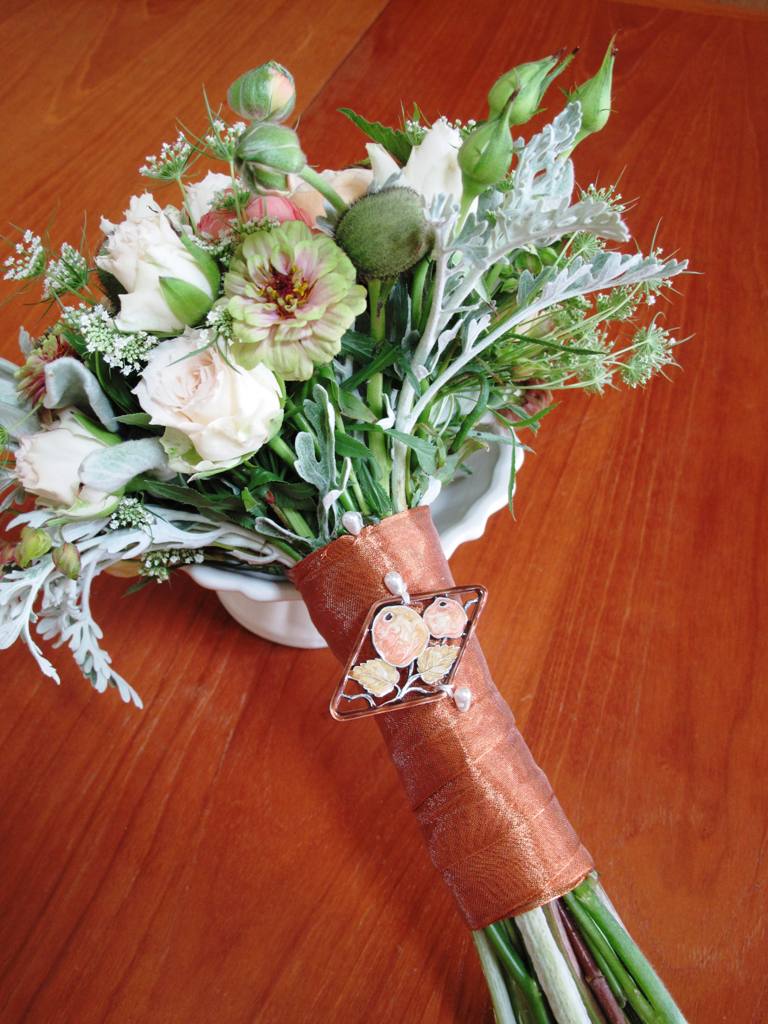
I finished off the ribbon handle with a vintage enamel button as a special accent.
4. One more fortuitous ingredient made its way into the bouquet, four or five Zinnia ‘Queen Red Lime’, with smaller-than-usual heads because they had been under cover for too long and grew a little wacky. These were gifted to me by the grower who promised the rest of her zinnias will have the normal 2-inch-sized flower head later in the season. I certainly didn’t mind because the multi-colored petals, ranging from pale lime to dark terra cotta pink, added just the right accent to the bouquet.
Making it:
1. Purchase and process all of the flowers in the early morning. I stripped off foliage, recut all stems, and placed them in clean buckets w/clean water to hydrate for a few hours.
2. At 3 p.m., I made the bouquet, using a hand-tied method. I wrapped the stems with floral tape and then added the decorative ribbon (including sewing a vintage button onto the handle). The unwrapped portion of the stems rested in about 1-inch of water in a mason jar while I made the boutonniere.
3. The boutonniere recipe includes: 2 small lamb’s ear leaves + 1 small, lacy Dusty Miller leaf + 1 small Zinnia ‘Queen Red Lime” blossom + 1 bunny tail grass. Wrapped with tape; then wrapped with ribbon and given a pearl-headed pin.
Prepare the shipping box:
1. I used a recycled box previously used to ship bulbs in; conveniently, it had several small holes punched in the sides to make it breathable.
2. I filled the bottom half of the box with recyclable packing peanuts.
3. I added three freezer gel-packs that I’d saved from a previous flower shipment, dispersed around the bottom and sides of box.
4. I prepped the bouquet by wrapping the bottom (exposed / cut ends) in a dampened double layer of paper toweling. Then I placed the entire handle into a one gallon ziplock bag, which I “closed” around the neck of the bouquet. Similarly, I wrapped the boutonniere in damp paper towels and popped it into a cellophane bag.
5. I swaddled the bouquet in layers of quilt batting to protect it from getting bumped around the inside of the box. The bundle rested gently on top of the packing peanuts and frozen gel packs.
6. Added the boutonniere bundle and then topped off the box with more batting before taping the box closed.
Shipping:
6 p.m.: I drove to FedEx, which is about 3 miles from my home, and paid more than $100 to overnight it to the Midwest. It sounds like a lot, but it was worth the joy of knowing my friend would hold a bouquet made by my hands with love. And think about it, if she had to order a bridal bouquet from a local florist, she would probably pay around that amount.
All in all, I spent around $150 for the flowers and shipping. The best news was calling the bride first thing yesterday to hear that the box arrived safe and sound at 9:30 a.m., about 14 hours after I had shipped it. The flowers were in great shape and she immediately put them in water to keep fresh until this morning.
This method might not work as well in the middle of August when Midwest temperatures climb to 100-plus. But this week, we got lucky.

Bouquet + Boutonniere, sent to 2 special people who are wed today!
May 28th, 2013 at 6:04 am
Thank you for this, I’ll tell my sister how can we make bouquet for her wedding.
October 3rd, 2013 at 1:28 pm
Thank you for this and your details! So very helpful!